User Flow Diagrams
Lesson Prerequisites
- Completion of Brainstorming lesson
Purpose of User Flow Digrams
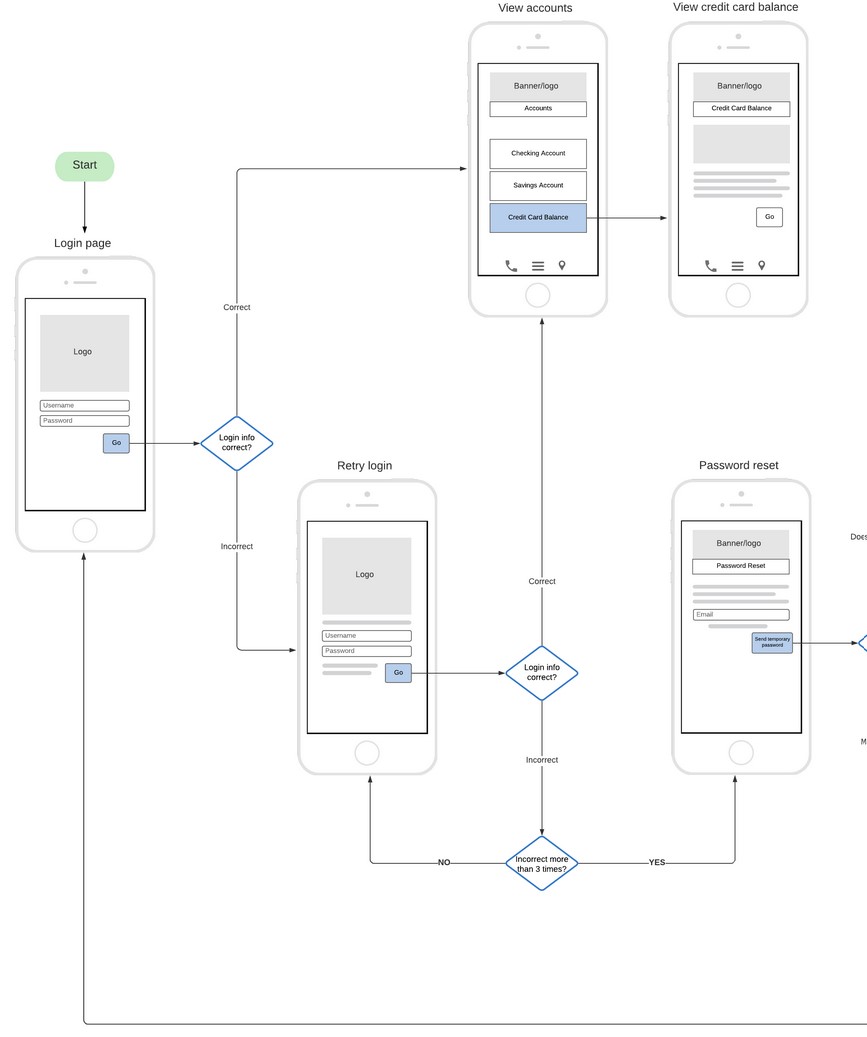
A user flow diagram is a visual representation of the steps that a user takes to complete a task on a website or application. In the case of a login page, the user flow diagram will show the steps that a user takes to successfully log into the platform.
To create a user flow diagram for a login page, follow these steps:
-
Identify the key components of the login page: This may include the login form, registration link, forgot password link, and any other relevant features.
-
Identify the different user paths: Think about the different scenarios that could occur when a user attempts to log in. For example, a user may have an existing account or may need to create a new one. They may also forget their password and need to reset it.
-
Map out the user flow: Start with the initial state of the user, such as arriving on the login page. Then, map out each step that the user will take to complete the login process. This may include entering their username and password, clicking the “login” button, and being redirected to the main dashboard or homepage.
-
Use symbols and arrows to represent the user flow: To create a clear and easy-to-understand diagram, use symbols to represent each step and arrows to connect the steps in the correct sequence.
-
Iterate and refine the diagram: After creating the initial diagram, review it to ensure that it accurately represents the user flow. Make any necessary adjustments and continue to refine the diagram until it is clear and easy to follow.
By following these steps, you can create a user flow diagram for a login page that will help you understand the user experience and identify any potential issues or areas for improvement.
Activity: Define User Actions for App
- Identify the different user actions and tasks that the app will allow users to perform, such as creating an account, logging in, navigating to different pages, and completing tasks.
- Create a list of these tasks and actions in the order in which a user would typically perform them.
Creating Diagrams with Diagrams.net
Create New Diagram
-
Go to diagrams.net in your web browser
Note: It is recommended that you open diagrams.net on a desktop or laptop if possible
-
Digrams.net will ask you where to create your new diagram. Select the “Google Drive” option

-
When asked to authorize, select “Authorize”

-
When asked to sign in, use your school email address and password
Note: For Mac users, Safari may have pop up windows disabled by default, which will cause a white screen to appear when trying to log in. To re-enable pop up windows temporarily select the “screen” icon in your toolbar as seen below

-
When asked to create a new diagram, type a name for your diagram in the “Digram name:” box and select “Blank Diagram”

Opening Exisiting Diagram
-
Open your Google Drive
-
Find and select the file with the extension .drawio

-
Select “Open with diagrams.net” at the top of the screen

Exporting Diagram
-
Open your diagram from Google Drive
-
Select “File” -> “Export as” -> “PNG”

Adding Boxes to Diagram
- Open the diagrams.net web application in your browser.
- Create a new diagram or open an existing one.
- On the left-hand side of the screen, click on the “Basic Shapes” icon, which looks like a square with a plus sign in the center.
- Select the “Rectangle” shape from the list of available shapes.
- Click and drag the mouse cursor on the page to draw a box of the desired size.
- To adjust the size of the box, click on one of the corners and drag it to the desired size.
- To add text to the box, double-click on the box to enter edit mode, and start typing.
- To change the color of the box, click on the box to select it, and then click on the “Fill Color” or “Line Color” icon in the toolbar at the top of the screen. Select a color from the available options or create a custom color.
- Repeat steps 3-8 to add additional boxes to the page as needed.
- To move a box, click and drag it to the desired location.
- To delete a box, click on it to select it, and then press the “Delete” key on your keyboard.
Activity: Sketch Diagram
- Sketch out a basic user flow diagram on paper or using Diagrams.net to visualize the user journey through the app.
- Use boxes or other shapes to represent each screen or page in the app, and draw arrows to connect the boxes in the order that the user will navigate through them.
- Add any additional details, such as buttons or forms, to each screen in the diagram.
- Review your user flow diagram to make sure it is easy to follow and accounts for all necessary steps in the user journey.