Wireframing
What are Wireframes?
Wireframes are simple, low-fidelity sketches or diagrams that represent the basic structure and layout of a mobile app or website. They are used during the early stages of design to establish the user interface (UI) and user experience (UX) of the app, before any visual design or content is added. Wireframes can be created using a variety of tools, from paper and pencil to specialized digital design software.
In mobile app development, wireframes are used to:
-
Help designers and developers establish the layout and hierarchy of the app’s screens and features. This includes defining the navigation flow, organizing content, and determining which elements will be included on each screen.
-
Allow designers and developers to test and refine the app’s user experience (UX) by identifying potential issues with navigation, usability, and accessibility. By testing the wireframes with real users or stakeholders, designers can gather feedback and make adjustments before moving on to the visual design phase.
-
Can save time and resources by identifying potential problems or areas for improvement before committing to a full visual design. This can help reduce the risk of costly redesigns or delays later on in the development process.
Overall, wireframes serve as a key tool for mobile app development, helping designers and developers define the app’s structure and user experience early on in the design process. They are an important step in creating a successful and user-friendly app.
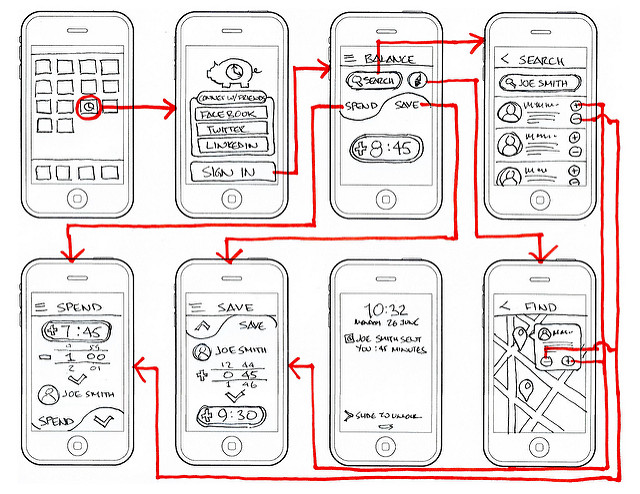
There are three important parts of a wireframe - layout, structure, and content.
Layout means where different parts of the app will go, like buttons, pictures, and text boxes. Think of it like arranging the furniture in your bedroom or living room, so everything fits and is easy to find.
Structure means how the information in the app will be organized. Think of it like how chapters in a book are organized, or how the different sections of a newspaper are arranged.
Content means what kind of information will be in the app, like text, pictures, or videos. It’s like deciding what pictures to hang on your bedroom walls or what books to put on your bookshelf.
By thinking about these three things, designers can create a wireframe that will be easy to use and understand for people who will use the app.
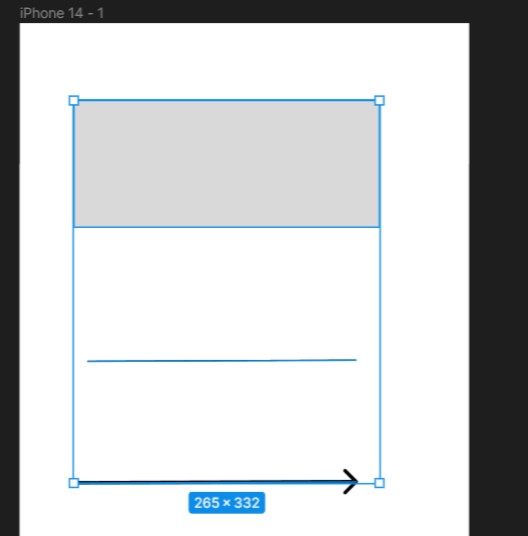
Creating a Frame
In Figma, a frame is like a window that you can put your wireframe inside. It’s like putting a picture in a frame, but instead of a picture, it’s your wireframe!
You can use frames to organize your wireframe and make it easier to work on. Frames can be resized and moved around the canvas, so you can put multiple frames side-by-side or on top of each other to create a big picture of your wireframe.
Frames can also help you focus on one part of your wireframe at a time. For example, you can create a frame for the home screen of your mobile app, and then create separate frames for each button or section of the home screen. This can make it easier to see how everything fits together and make changes if needed.
Using frames in Figma for wireframing can help you create a well-organized and easy-to-use design for your mobile app. By breaking your design into smaller pieces, you can focus on each part and make sure it works well before putting everything together.
Below are step by step instructions for adding frames to your design file:
-
Open your Figma file and select the page or artboard where you want to add a frame.
-
From the toolbar on the left side of the screen, click on the “Frame” icon (the square with a plus sign inside).
-
On the right side of the screen under the design tab, select a frame size from the available phone sizes
-
After you select a size, a blank frame will be created similar to the one below:
-
You can also add additional frames by duplicating an existing frame layer or using the keyboard shortcut “Ctrl+D” (Windows) or “Command+D” (Mac) to duplicate the selected frame.
Activity: Create A Frame
Create an open a Figma design file and add a frame to the page
Grouping Objects
Grouping objects in Figma is like putting different things together. Imagine you’re building a house with LEGO blocks. You have different pieces like windows, doors, and walls. In Figma, it’s similar to that, but instead of LEGO blocks, we have objects like buttons, text boxes, and images.
To create components in Figma, we group these objects together to make a reusable unit. It’s like putting several LEGO blocks together to make a bigger, more complex structure.
Here’s a step-by-step explanation:
- Just like a button on a website or an app, we can create a button in Figma. We can choose its shape, color, and size.
- We can also add text inside the button to show what it says, like “Click Me!” or “Submit.”
- Now, we want to make this button a component so we can use it multiple times. We select the button and the text, and then group them together. It’s like putting them inside a special box that keeps them together.
- Naming the component: We give this component a name, like “Button Component.” This helps us identify it easily later on. 1.Now that we have our button component, we can use it in different places. We simply drag and drop it onto our wireframe, and it appears as a single unit.
Below are step by step instructions for grouping objects:
-
Open your Figma file and select the objects that you want to group. You can select multiple objects by highlighting the objects with your mouse or by holding down the Shift key and clicking on each object.
-
Right-click on one of the selected objects and choose “Group” from the context menu. Alternatively, you can use the keyboard shortcut “Ctrl+G” (Windows) or “Command+G” (Mac) to group the objects.
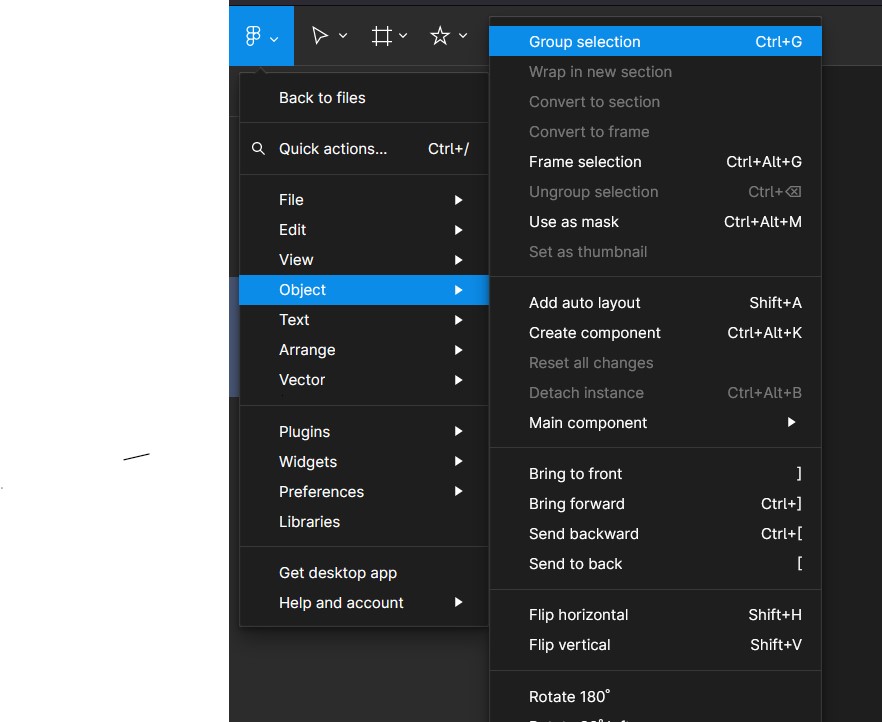
-
The selected objects will now be grouped together in a single layer. You can move, resize, and transform the entire group by selecting the group layer with the selection tool (the arrow icon). —>
By grouping objects together and creating components, we can save time and maintain consistency in our wireframes. It’s like having a set of reusable LEGO pieces for building different structures.
Activity: Creating a Button
Create a button with some text by grouping text and shapes
Ungrouping Objects
- Right-click on the group layer and choose “Ungroup” from the context menu. Alternatively, you can use the keyboard shortcut “Ctrl+Shift+G” (Windows) or “Command+Shift+G” (Mac) to ungroup the objects.
- The objects that were previously grouped together will now be separated into individual layers. You can select and edit each layer individually.
- If you want to rename any of the individual layers, double-click on the layer name in the layers panel and type a new name.
Activity: Ungrouping Shapes and Text
Ungroup the shapes and texts that you grouped in the previous activity and then group all the shapes and texts except for the logo
Creating Prototypes
In Figma, a prototype is like a pretend version of a website or app that designers can use to see how it will work before it’s actually made. It’s like a big puzzle with different pieces that fit together, and designers can click on the different parts to see what happens.
For example, if a designer wants to make a button that takes you to a different page, they can use the prototype to see if the button works and if it takes you to the right place. This helps the designer figure out if their design is good or if they need to make changes.
Below are step by step instructions for creating a prototype:
- Open your Figma project and select the frame or object you want to create a prototype for.
- Click on the “Prototype” tab in the right-hand sidebar.
- Click on the “New Connection” button to create a new interaction.
- Select the object or frame you want to link to and drag the arrow to connect the two.
- Choose the type of interaction you want to create, such as “On Click” or “On Hover”.
- Choose the animation effect you want to use, such as “Dissolve” or “Slide”.
- Customize the duration and easing of the animation to your liking.
- Repeat the process to create additional interactions between frames or objects.
- Once you’ve created all the interactions you want, click on the “Present” button in the top right corner to preview your prototype.
- Use the preview mode to test your prototype and make sure all the interactions are working as intended.
Activity: Creating A Simple Prototype
Create a simple prototype for a mobile app that allows users to browse and order food from a restaurant. Include at least two screens with interactive elements such as buttons or navigation links. Ensure the prototype demonstrates the flow from the home screen to the menu screen
Putting It All Together
- Create a new frame with a width of 375 pixels and a height of 812 pixels. Name it “iPhone X.”
- Inside the “iPhone X” frame, create three additional frames with the following dimensions:
- Frame 1: Width 375 pixels, Height 812 pixels. Name it “iPhone 11 Pro Max.”
- Frame 2: Width 375 pixels, Height 667 pixels. Name it “iPhone 8.”
- Frame 3: Width 360 pixels, Height 640 pixels. Name it “Android Pixel 4.”
- In the “iPhone 11 Pro Max” frame, create a header section by adding a rectangle shape, text, and a logo image.
- Group the rectangle, text, and image objects together.
- Duplicate the header section and place it in the “iPhone 8” and “Android Pixel 4” frames.
- Modify the text content in each frame to represent different page titles.
- Navigate to the Prototype mode in Figma.
- Link the frames together to create a navigation flow. For example:
- From the “iPhone 11 Pro Max” frame, create a hotspot to link to the “iPhone 8” frame.
- From the “iPhone 8” frame, create two hotspots to link back to the “iPhone 11 Pro Max” frame and forward to the “Android Pixel 4” frame.
- From the “Android Pixel 4” frame, create a hotspot to link back to the “iPhone 8” frame.
- Add transition effects to the hotspots to simulate page transitions (e.g., slide, dissolve, etc.). Test the prototype by previewing it and navigating through the frames.
Vocabulary Review
| Terms | Definitions |
|---|---|
| wireframes | - |
| layout | where different parts of the app will go |
| structure | how the information in the app will be organized |
| content | what kind of information will be in the app |
| frame tool | - |
| Grouping objects | - |
| protoype | a pretend version of a website or app that designers can use to see how it will work before it’s actually made |