Introduction to HTML
Lesson Requirements
- Complete Intro to Web Design Lesson
- Notepad++ Installed on Computer
What is HTML
HTML stands for “HyperText Markup Language.” It is a type of computer language that is used to create and design websites on the internet.
Think of HTML like the blueprint of a house. Just like how a blueprint shows the different rooms and features of a house, HTML shows the different parts of a website, like the text, pictures, and links.
Using HTML, website designers can create different headings, paragraphs, and lists of information that people can read and interact with on the internet. HTML also helps to create the layout of a website so that it looks good and is easy to use.
An HTML tag is like a label that tells a web browser how to display the content on a web page. Just like how you might label your school supplies or clothes with a tag, HTML tags label different parts of a web page.
For example, if you want to create a heading on a web page, you would use an HTML tag called <h1>. This tag tells the browser that the text following it is a heading, and the browser should display it in a larger font and make it stand out from the rest of the text on the page.
Here’s another example: if you want to add an image to a web page, you would use an HTML tag called <img>. This tag tells the browser that an image is being added, and provides information about where to find the image and how to display it on the page.
Overall, HTML tags are like labels that give instructions to the web browser about how to display the different parts of a web page, including headings, paragraphs, images, links, and more.
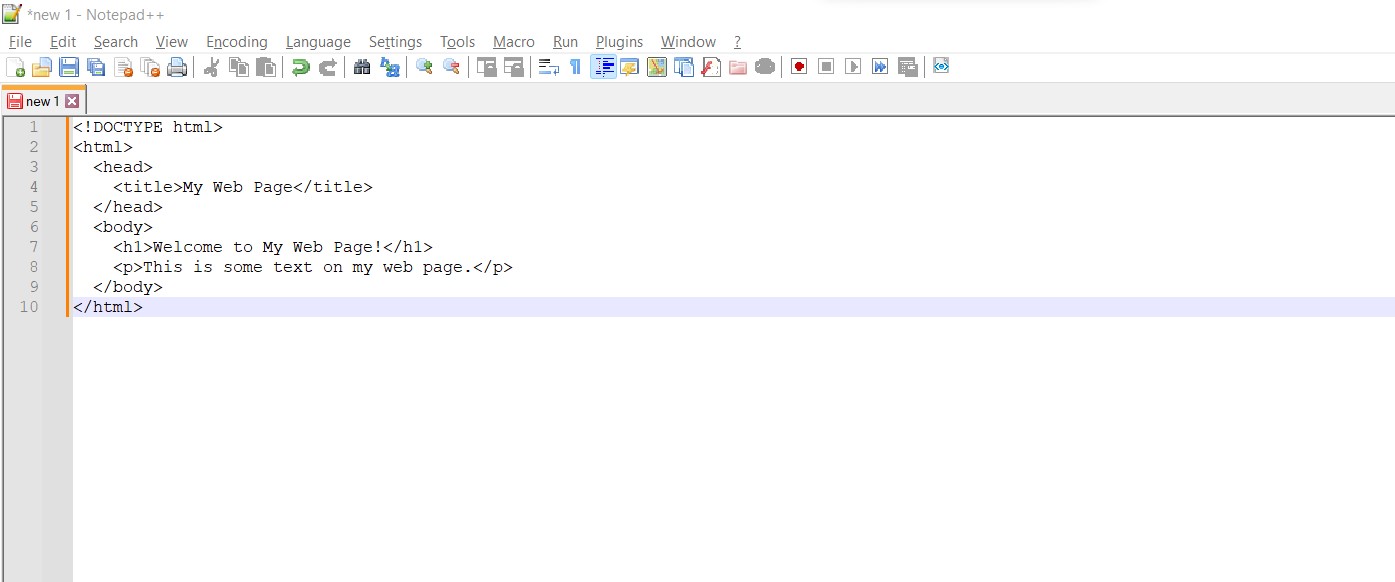
Here is an example of the basic structure of an HTML document:
<!DOCTYPE html>
<html>
  <head>
    <title>My Web Page</title>
  </head>
  <body>
    <h1>Welcome to My Web Page!</h1>
    <p>This is some text on my web page.</p>
  </body>
</html>
Let’s break down the different parts of this HTML document:
html <!DOCTYPE html>: This is a special line that tells the browser that the document is written in HTML.<html>: This tag marks the beginning of the HTML document.<head>: This is where information about the document is stored, such as the title that appears in the browser tab.<title>: This tag is used to give the web page a title, which appears in the browser tab.<body>: This is where the main content of the web page is stored.<h1>: This tag is used to create a heading. In this example, it says “Welcome to My Web Page!”<p>: This tag is used to create a paragraph. In this example, it says “This is some text on my web page.”
So, when a browser reads this HTML document, it will display a web page with a heading that says “Welcome to My Web Page!” and a paragraph of text underneath it.
Overall, the basic structure of an HTML document includes the <html>, <head>, and <body> tags, and can include other tags like <title>, <h1>, and <p> to create content on the web page.
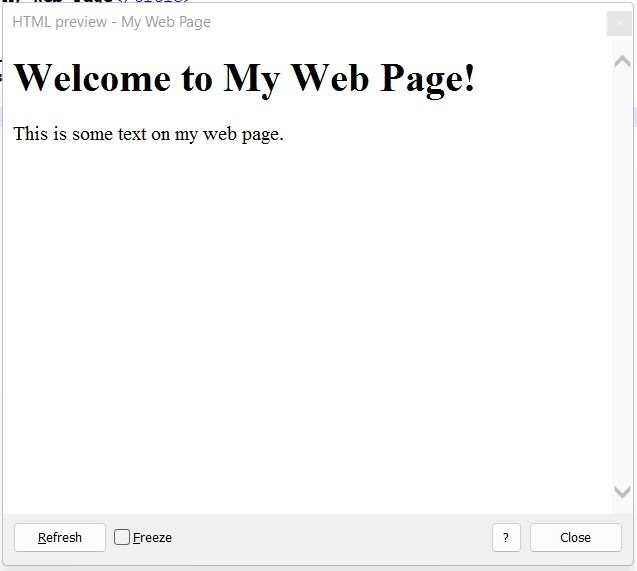
Activity:
Press the Run button below to see what the web page would look like for the example above
Writing HTML With Notepad++
Notepad++ is a computer program that lets you write and edit text, kind of like a digital notebook. You can use it to write notes, create to-do lists, or even write stories. It’s like having a special digital notebook that helps you keep track of all your ideas and thoughts! Here, you are going to learn how to use Notepad++ to write HTML.
- Start Notepad++ by clicking on the desktop top icon that looks like the following:
![]()
- After starting Notepad++, your screen should look like the following image below:

- You can type any HTML text you want inside Notepad++. For example, if you were to type the HTML from the previous example, it would look like the image below:
-
Once you are ready to save the text that you typed, you click “File” and then click “Save”.
-
After clicking “Save” you will be asked to get the file a name in the “File name” box. Whenever you give your file a name always put “.html” at the end of the file

-
Once you given the file a name. You can select the “Save” button
-
To see what the web page looks like, select “Plugins” at the top of the screen, then select “Preview HTML”, then select “Preview HTML” again. You should then see some similar to the picture below
Activity: Creating HTML File
Open a new file in Notepad++ by selecting the “File” button and then selecting “New”. Inside the new file type the HTML from the example above and replace
<title>My Web Page</title>with<title>This Is My Web Page</title>. Then, preview the web page using the “Preview HTML” button
Commenting your HTML
In HTML, you can add comments to your code to provide notes or explanations for yourself or other people who might read your code later. Comments don’t affect how the webpage looks - they’re just text that’s ignored by the web browser.
To add a comment in HTML, you use the tags. Anything you put between these tags will be ignored by the web browser. For example, if you wanted to add a comment that says “This is a comment” to your code, you would do it like this:
<!-- This is a comment -->Here’s another example. Let’s say you have a section of your webpage that you want to temporarily remove, but you don’t want to delete the code completely. You could add a comment around the code to “disable” it like this:
<!--
<h2>This section is temporarily disabled</h2>
<p>Some text here</p>
-->
In this example, the h2 and p tags are commented out, so they won’t be displayed on the webpage. But the code is still there, so you can easily re-enable the section later by removing the tags.
Remember, comments are a great way to add notes and reminders to your code, but don’t overuse them! Make sure your code is still easy to read and understand, even with comments.
Putting It All Together
Review the HTML example above, then try to recrerate the HTML strucutre without using the example. Use comments to describe what what each line of HTML is doing
Vocabulary Review
- HTML
- HTML tag
<html>html <!DOCTYPE html><head><title><body><h1><p>- comments